Friday, November 20, 2009

Turkey Shirt

Okay, it's been a long while since I've posted anything, and especially anything sewing. I really have baked stuff and I have several things ready to go up, but it has been crazy around here. Anyway, we had playgroup at my house this week and I was complaining how I never have time to sew anymore. One of my friends told me that her friend made a turkey shirt for one of her kids. She kind of described it to me and this is what I came up with:

I think it turned out pretty dang cute! I cut out feathers from 4 different fabrics and used wonder under and ironed them onto the shirt first. Then I zigzag stiched around each of them. Then I attached the turkey legs, body and face, and stiched around them. It was a fairly simple project. Except, the 3T shirt kept bunching up when I was sewing and that made it a little difficult, but it was worth it! I am so proud! Here's a close up of the stiching.

My next "turkey" project is a bow that my husband's aunt showed me last year. It is a turkey bow and I just got the ribbon to do it...now all I have to do is find the time! My in-laws come in today and I actually have to leave RIGHT NOW to go pick them up!
Posted by Picasa

Thursday, November 5, 2009

Bananas Foster Cheesecake

DESSERT FIRST...
I made a nice dinner tonight and we had some friends over. I plan on posting pictures and recipes of the whole meal, but dessert has always been my favorite, so let's start with that!
The cheesecake is a recipe I got from my Nana and I've adapted it a little bit so I can be creative. I'll put the original recipe for "Nana's Chocolate Chip Cheesecake" some other time. This cheesecake is so creamy and I use cinnamon graham crackers for the crust for that extra little something. The cheesecake is topped with sliced bananas and a homemade caramel sauce. The sauce thickened up a little too much for me this time, so I'll tweak it a little next time.


Bananas Foster Cheesecake

Crust:
1 c. graham cracker crumbs (I use cinnamon)
2 T. sugar
1/4 c. melted butter

Filling:
3 (8 0z) pkgs. cream cheese, softened
1 1/3 c. sugar
4 eggs
1 tsp. vanilla

Caramel Topping:
1/2 c. (1 cube) butter
1 c. brown sugar
1 c. karo syrup
1 can sweetened condensed milk
1 tsp. (or more) vanilla

Bananas

For the Crust: mix all ingredients with a work and press into bottom and partway up sides of springform pan.

For the Filling: Mix all ingredients until smooth and pour into the prepared crust. Bake at 325 degrees for 50-60 minutes or until the center is done but still a little jiggly. Let cool completely. Refrigerate until ready to serve.

For topping: Slice bananas and set aside. To make the caramel: melt the butter in a medium saucepan. Add brown sugar, karo syrup, and sweetened condensed milk. Bring to a boil and boil for 1-2 minutes. Take off heat and add vanilla. Let cool for 5 minutes. Put a pool on the bottom of the dessert plate, place the cheesecake on top. Add sliced bananas and drizzle with more caramel sauce.

Friday, October 9, 2009

Fluffy Skirt

This is the first official time I'm posting this type of skirt, but I have made several. Jaci has a couple in different colors and then my aunt asked me to make on for her grandaughter for a wedding. They are SO CUTE! The first one I ever did was a little different; just a plain straight skirt that I didn't totally love. Soon after that I expanded by trying it by makinge a tiered ruffled skirt and then added the gathered tulle to each ruffle. I love the result! It is a fun, twirly and fluffy skirt that my daughter LOVES to wear!


I absolutely love Halloween colors; bright orange, purple and green off set by black. For this skirt I found this cute fabric at Hobby Lobby and made the gathered skirt. Then I gathered 3" wide black tulle and sewed it around the skirt.


I have done more sewng than this, but one dress I made for Jaci that is adorable, is a little big, so that one will have to wait until it can be modeled for pictures. I also made her Halloween costume and trick or treat bag, which turned out super cute, but I'll wait to put those pictures up a little closer to Halloween.
Posted by Picasa

Sunday, October 4, 2009

Raised Doughnuts

I was browsing through the blogs I follow the other day and came across these raised doughnuts on Real Mom Kitchen. I decided that it was a perfect time to try this out. I haven't made doughnuts in years, and I've never tried a raised doughnut, so this was an adventure. It is just a little time consuming, like making any good yeast rolls or bread, just letting it rise. It was fun to do though! They came out nice and fluffy on the inside and so yummy! Maple doughnuts have always been my favorite and these don't disappoint! My 2 year old daughter helped me mix (and eat) the dough and then helped me decorate them!

Now, since it's pouring outside, I think this will be the PERFECT opportunity to go relax with a doughnut and some hot chocolate! (I know, you're jealous!!!!)


Raised Doughnuts

5 c. all-purpose flour
1/2 c. sugar
1 tsp. salt
2 pkgs. active dry yeast (4 1/2 tsp.)
1 3/4 c. very warm milk
1/3 c. shortening
2 eggs
Vegetable oil

Mix 2 cups of the flour, sugar, salt and yeast in a large bowl. Add milk, shortening and eggs. Beat on low speed 1 minute, scraping the bowl frequently. Beat on medium speed 1 minute, scraping the bowl frequently. Sir in remaining flour until smooth. Cover and let rise in warm place about 1 hour or until doube. (Dough is ready if indentations remain when touched.)

Turn dough onto generously floured suface; roll around lightly to coat with flour. Flatten dough with hands or rolling pin to 1/2-inch thickness. Cut with floured 3-inch doughnut cutter. Cover doughnuts and let rise 30-40 minutes or until double.

Heat oil (1 1/2 - 2 inches) in Dutch oven to 350 degrees F. Slide doughnuts into hot oil with wide spatula. Fry about 1 minute on each side or until golden brown. Remove carefully from oil; drain on paper towls. Roll in cinnamon sugar or dip tops of doughnuts in glaze. See recipes below. One recipe is enough to cover all doughnuts, so if you do both, only make half of each.

White Doughnut Glaze

2 c. powdered sugar
1 tsp. vanilla extract
4-6 T milk or cream

Combine all ingredients into bowl with a fork. If the glaze is too thick add extra milk.

Maple Doughnut Glaze

2 c. powdered sugar
2 tsp. maple extract
4-6 T. milk or cream

Combine all ingredients into bowl with a fork. If the glaze is too thick add extra milk.
Posted by Picasa

Monday, September 7, 2009

Irresistible Peanut Butter Cookies


I know I said no more peanut butter for a while, but too bad! I found these cookies a long time ago, I don't even remember where, and they have been my favorite peanut butter cookies since. They are soft and delicious. I like to add peanut butter chips and reese's pieces to mine to add a little something extra.

The other night, Jaci was tearing up the house, so we decided to make cookies together. She just wanted to keep dumping things in the bowl and didn't want to let ME help!

Irresistible Peanut Butter Cookies

1 1/2 c. brown sugar
3/4 c. creamy peanut butter
1/2 butter flavor Crisco stick
3 T. milk
1 T. vanilla
1 egg
1 3/4 c. flour
3/4 c. baking soda
3/4 tsp. salt

Preheat oven to 375 degrees. Combine brown sugar, peanut butter, shortening, milk, and vanilla in a large bowl. Beat at medium speed until well blended. Add egg. Beat just until blended. In separate bowl, combine dry ingredients. Add to creamed mixture at low speed just until blended. Drop by rounded tablespoonfuls 2 inches apart on ungreased cookie sheets. Flatten slightly in crisscross pattern with tines of a fork. Bake one sheet at a time for 7-8 minutes or until set and just beginning to brown. DO NOT OVERBAKE! Cool 2 minutes on baking sheet. Remove to waxed paper or wire rack to cool completely. Makes about 3 dozen.

Saturday, August 22, 2009

A Felt Cherry Pie and a Baby Outfit

Yesterday, my sister-in-law told me I had to look at Martha Stewarts website and see the felt food they made. So, I did, and I immediately downloaded the template and went to the store and bought all the supplies. I also ended up ordering the templates of a bunch of other foods from the lady that was demonstrating. You can find her site here. Anyway, it was fairly easy, the most time consuming part was a little hand stitching. It's not perfect, but it turned out pretty cute, right? My daughter, Jaci, loves her play kitchen, so I made it for her to play with.

Also, I made this a little while ago for my friend that was having a baby. I didn't want to post it before now just in case she saw it, but...she's in the hospital right now and she just had her baby (yay!) so I think it's safe. I love this little outfit! I found the onsie and I cut it off and added the skirt and then added a band and elastic to the bottom to make a diaper cover. Jane (the baby's mom) said she didn't want too much pink, so I was excited to find this onsie, with only a little pink! Welcome, Halle! We're excited to meet you!

Thursday, August 20, 2009

Bow Board

I am finally posting one of my non-food related projects. I have several more, but I'm not good at taking pictures of clothes and my daughter will never pose so you can see what she's wearing. So, for now, here's this bow board. I saw one of these at one of my all time favorite stores, Ribbons and Lace. It is an amazing store with rows and rows of (you guest it) ribbons and lace!

It was super easy! I got a 16 x 20 canvas and then you basically just hot glue ribbons down it. I also did one across the top and painted the title "Jaci's Bows" on it. Then I hot glued a ribbon all around the side edge, so you wouldn't see the other ribbon ends. I used the colors that are in her room, so it would match everything. I think it turned out cute!

It also makes her bows (all of which I've made) that are usually scattered about all over the house look more like a piece of artwork or something. I'm all about getting things organized and decluttered these days, so this bow board is just the thing! I also hung a star peg I've had for hears next to it to put all her necklaces on it that my sister-in-law made. (She's in the process of getting her "Heartbaby Boutique" blog back up. I'll let you know when it does.) She makes the cutest things!


My next project is to get my sewing cabinet up and running. My husband's cousin was getting rid of an old computer cabinet so he let us have it. My goal is to get it situated adn all set up with my sewing machine, serger, and all my sewing supplies. Once that gets done, I'll be able to get sewing again. I have several unfinished projects and hundreds of ideas! They'll be coming soon!

Tuesday, August 18, 2009

Cookie Dough Brownies


This is another copycat recipe that I found on a couple of other blogs including Bakerella and The Girl Who Ate Everything, but they originally come from Betty Crocker. Don't worry. I'll be putting my own recipes on here soon! These I also made for our ward linger longer on Sunday. They, like the brownie bites, were a hit! Anything that looks a little different or out of the ordinary usually get people curious and want to try! These not only are a copycat recipe, but a cheater recipe too. They take all of 5 minutes to put together. The recipe calls for a Betty Crocker chocolate chip cookie mix. I didn't have one on hand, and my grocery store had every kind, but that kind, so I cheated extra and used the log of refrigerated dough. It worked out well though and then I didn't have to get another bowl dirty!

Cookie Dough Brownies

1 box of your favorite brownie mix
1/3 c. vegetable oil
1/4 c. water
2 eggs
1 pouch chocolate chip cookie mix
1/2 c. butter, softenend
1 egg
1 container chocolate frosting

Preheat oven to 350 degrees. Line 9 x 13 pan with foil and then spray the bottom with cooking spray. Make brownie mix as directed on the box using oil, water and 2 eggs. Spread in pan.

Make cookie mix and directed on pouch, using butter and 1 egg. Drop dough by rounded tablespoonfuls evenly into brownie batter; press down slightly.

Bake 35-40 minutes or until toothpickinserted 2 inches from side of pan comes out almost clean. Cool on rack 30 minutes. Frost with frosting. When completely cooled lift out of pan with foil and place on cutting board (this makes cutting the bars much easier) Cut into 8 rows by 6 rows.

Monday, August 17, 2009

Peanut Butter Brownie Bites


Okay, I've been told that there's a theme to my baking...peanut butter. I have to admit that is true. Peanut butter is probably my favorite ingredient to use in desserts. Just about everything tastes better with peanut butter. However, after this recipe I am going to try to broaden my horizons and NOT use peanut butter for a while. Although, I promised someone I'd make them a frozen peanut butter pie soon, but that doesn't count.


Anyway, I was asked to make a dessert for our ward linger longer yesterday. I wanted to do something yummy, but I wanted it to be kind of quick and easy since I just got back from vacation and my house was still a disaster! I found these little gems on one of my favorite food blogs, The Girl Who Ate Everything. They were super easy and "SEW TASTY"!!! This was totally a cheater recipe since I didn't have to hardly actually MAKE anything.


Peanut Butter Brownie Bites

1 box of your favorite brownie mix
1/4 c. water
1/3 c. vegetable oil
2 eggs
1 c. peanut butter
1/4 c. powdered sugar
garnish: peanut butter chips and chocolate chips

Preheat oven to 350 degrees. Line a mini muffin pan with liners and set aside. In large bowl, combine brownie mix, water, oil and eggs until well incorporated. Drop about 1T. batter into each liner and bake 15-20 minutes or until a toothpick inserted in the center comes out clean. Using a measuring teaspoon make an indentation in the top of each brownie bite. Microwate peanut butter for 30-45 seconds until warm and smooth. Add powdered sugar and stir until combined. Fill each brownie indentation with the peanut butter mixture and top with chocolate and peanut butter chips.

P.S. I had to make a little more of the peanut butter mixture, because I like mine a little full!

Saturday, August 15, 2009

Nana's Peanut Butter Pie

As my last HURRAH on my "vacation" in Arizona I made a Peanut Butter Pie. My grandma, Nana, asks for one every year for her birthday. Since her birthday is next week, I decided to go ahead and make one (or two) before I left for Louisiana.

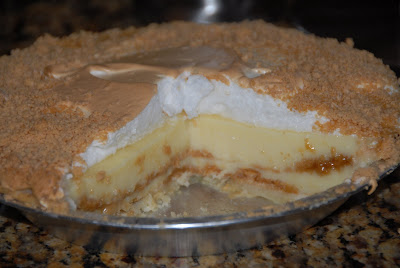
The pie is really yummy. It has a layer of peanut butter stuff, a layer of homemade vanilla custard, another layer of peanut butter stuff, and then another layer of custard, and then topped off with a meringue and more peanut butter crumbly stuff.

Nana's Peanut Butter Pie

3/4 c. powdered sugar
1/2 c. peanut butter
3/4 c. granulated sugar
3 T. cornstarch
1 T. flour
1/8 tsp. salt
3 eggs
3 c. milk
2 tsp. butter
1 tsp. vanilla
1-9" baked pie shell
1/4 tsp. cream of tartar

Combine powdered sugar and peanut butter to make coarse crumbs. Set aside.

In 2 qt. saucepan, stir together 1/2 c. granulated sugar, cornstarch, flour and salt. Separate eggs, placing whites in a separate bowl and set aside to warm to room temperature. Add yolks to sugar mixture in saucepan along with milk. With wire whisk, stir until very well combined. Over medium heat, stirring constantly, heat milk mixture to boiling. Cook, stirring 2 minutes longer. Remove pudding from heat, stir in butter and vanilla. Heat oven to 375 degrees. Sprinkle 1/3 peanut butter mixture over bottom of pie crust. Spoon in half of the pudding, then sprinkle another 1/3 of the peanut butter mixture and top with remaining pudding.

Add cream of tartar to egg whites and beat until soft peaks form. Gradually add remaining 1/4 c. sugar and beat until stiff peaks form. Spread meringue over pudding in pie shell being sure to seal the edge of the pie. Sprinkle remaining peanut butter crumbs on pie to make a border. Bake 8-10 minutes - until meringue is golden brown. Cool completely on wire rack before cutting. Refrigerate.

Ryan's Chicken Enchiladas


While I was in Arizona, my "little" brother begged me for these for almost 2 months. He started his Jr. year of high school on Monday, so I decided to finally make them for him. I don't really have a recipe, I just kind of throw things together, but here goes! The filling is really yummy and creamy and cheesy!!! They are definitely a family favorite that I have to make every time I visit my parents!

Chicken Enchiladas

1 family size rotisserie chicken, shredded
2 cans cream of chicken soup
1 pkg. cream cheese, softened
1 large can green chili enchilada sauce
shredded cheese
Flour (or corn) tortillas

Mix soup and cream cheese until creamy. Add chicken and about 1/4 c. enchilada sauce. Mix well. Pour a little enchilada sauce on the bottom of a 9 x 13 pan to coat. Make a line of chicken filling down the middle of each tortilla and top with shredded cheese. Roll jelly roll style and place in prepared pan, seam side down. Repeat with remaining tortillas. Pour the rest of your enchilada sauce over the enchiladas and top with cheese. Bake at 350 degrees for about 30 minutes or until the cheese starts to brown.

Peanut Butter Balls

This is a recipe my mom found in some magazine and we both had to try it. I made them a couple of years ago and took on a road trip from Utah to Arizona. For some reason last week they popped into my head and I had to make them again!


It is basically a peanut butter mixture dipped in chocolate and rolled in peanuts. This time I decided to try a couple of different coatings on top of the chocolate (mainly because I ran out of peanuts)! My sister liked the plain ones the best, but my favorite are still the ones rolled in chopped peanuts.


Peanut Butter Balls


1/4 c. butter
1/2 c. creamy peanut butter
1/4 c. milk
3 2/3 c. powdered sugar
1 tsp. vanilla
1 1/2 c. chocolate chips
1 1/2 tsp. shortening
3 c. finely chopped peanuts

Line and 8" pan with foil and grease. Cook butter, peanut butter and milk over low heat until melted. Beat in powdered sugar and vanilla. Remove from heat and pour into prepared pan. Cool completely. Roll into 3/4" balls and refrigerate until firm. Melt chocolate chips and shortening together in microwave. Stir until smooth. Dip balls in chocolate mixture and roll immediately in chopped peanuts. Cool. Store in airtight container.

Saturday, August 1, 2009

Banana Peanut Butter Chocolate Chip Muffins

In the future I'm going to name these Kelcie's muffins. Banana Peanut Butter Chocolate Chip Muffins is just too long, and my younger sister, Kelcie, has eaten 3 in the past hour. I got this recipe from my mom's friend, Jennifer, and I adapted it a little bit. The result was a perfectly soft and fluffy tasty muffin. I'm not normally a big banana person, but these are delicious!


I had to add this picture of my daughter "helping" me put the chocolate chips on top. She kept grabbing a chocolate chip and a large pinch of dough and eating it!


Kelcie's Muffins

1/2 c. butter, softened
1 c. sugar
1 egg
1 tsp. vanilla
1/2 c. creamy peanut butter
1 tsp. baking soda dissolved in 1 T. HOT water
1 1/2 tsp. baking powder
2 c. flour (can use whole wheat flour)
3-4 smashed ripened bananas
1/2 c. mini chocolate chips + more for garnish

Preheat oven to 350 degrees.

To mashed bananas, add butter, peanut butter, sugar, egg and vanilla and mix until well combined. Add soda water and stir in flour and baking powder.

Put into greased or lined muffin tins and sprinkle with chocolate chips. Bake for 15-20 minutes.

Pops' Ranger Cookies


Okay, so here's the story on these cookies. When my dad was in High School a girl who liked him made him these cookies called "Ranger Cookies". My dad kept the recipe and my mom had it in her files. I made them for him a few years ago and he immediately knew what they were. So, I'm visiting my parents right now and I decided to make these for my dad, but I couldn't find the original recipe anywhere. So, I went online and searched for Ranger Cookies and came up with a bunch of recipes that were all pretty similar. I then asked my dad what he remembered were in them and adapted the recipe.

These cookies aren't super sweet. They are fairly stiff and hearty. They came out pretty good though. They have a little crunch and they came out soft in the middle.

Pops' Ranger Cookies

1 c. shortening
1 c. sugar
1 c. packed brown sugar
2 eggs
1 tsp. vanilla
1 tsp. baking soda
1/2 tsp. salt
1/2 tsp. baking powder
2 c. flour
2 c. rolled oats
1/2 c. shredded coconut
2 c. corn flakes or frosted flakes
1 c. chocolate chips

Preheat oven to 375 degrees.

Cream shortening with sugar and brown sugar. Add eggs and vanilla and beat until fluffy. Add baking soda, salt, baking powder and flour; mix well.

Stir in oats, coconut, cereal and chocolate chips.

Drop onto parchment lined cookie sheet and bake for about 12 minutes.

German Chocolate Bars


Anything "German Chocolate" always reminds me of my dad. Every year for as long as I can remember he always has German Chocolate Cake for his Birthday. For some reason I'm not a big fan of cake. Most of the time it is too dry. I like cake if it is really really moist. But, I LOVE the coconut pecan frosting that goes on the cake. I make it and put it on just about anything, including ice cream, brownies, cookies...anything. Anyway, I came across this recipe for German Chocolate Bars and thought I'd give it a try. It is super easy and only has 5 ingredients! The bottom is like a cookie and the top is like a brownie, with the frosting in the middle. This is a totally semi-homemade recipe since it uses a boxed mix and a jar of the store bought frosting, but it tastes totally homemade. That's the best kind of recipe when you don't have to do all the work, but you can take all the credit!

German Chocolate Bars

2/3 c. butter softened
1 box German Chocolate Cake mix
1 c. semisweet chocolate chips
1 containter Coconut Pecan Frosting
1/4 c. milk

Heat oven to 350o. Lightly grease 9 x 13 pan. In medium bowl, cut butter into cake mix, using pastry blender, until mixture looks like fine crumbs. Press half of the mixture into bottom of pan. Bake 10 minutes. Sprinkle chocolate chips over baked layer. Drop frosting by tablespoonfuls over chocolate chips. Stir milk into remaining cake mixture. Drop by teaspoonfuls onto frosting layer. Bake 24-28 minutes or until cake portion is slightly dry to touch; cool completely. Refrigerate until firm. Cut into bars.


Peanut Butter Polka Dot Bars

These babies are SO good, but they are pretty rich, so I cut them pretty small. My husband and I went on a picnic with 3 other couples a couple of months ago and I was in charge of the dessert. Surprise, surprise!!! They guys LOVED them. They couldn't stop raving about them and kept telling me I should sell them.

I love the soft, creamy, chocolatey filling in these bars! Of course, anything with chocolate and peanut butter is amazing in my book! Plus, I love Reese's Pieces. These are the ultimate chocolate/peanut butter bar. They are sure to be a crowd pleaser!


Peanut Butter Polka Dot Bars

¾ c. butter, softened
¾ c. creamy peanut butter
2 c. light brown sugar, packed
2 eggs
1 tsp. vanilla extract
2 ½ c. quick rolled oats
2 ½ c. flour
1 tsp. baking soda
½ tsp. salt
1 1/3 c. mini Reese’s Pieces

CHOCOLATE FILLING:
½ c. butter
2/3 c. Hershey’s cocoa
1/3 c. sugar
1 can (14 oz) sweetened condensed milk
1 ½ tsp. vanilla extract

Heat oven to 350 degrees.

For bars: Beat butter, peanut butter and brown sugar until well blended. Add eggs and vanilla; beat thoroughly.

Stir together oats, flour, baking soda and salt; gradually add to butter mixture. (Dough will be thick.) Remove 2 c. dough; set aside. Press remaining dough onto bottom of 9 x 13 pan.

Prepare chocolate filling by melting ½ c. butter. Stir n cocoa and 1/3 c. sugar. Add sweetened condensed milk; cook, stirring constantly, until smooth and thick. Remove from heat; stir in 1 ½ tsp. vanilla extract. Spread filling evenly over dough. Sprinkle candy pieces evenly over filling. Crumble reserved dough on top.

Bake 25 minutes or until top is golden brown. (Chocolate will be soft.) Cool completely in pan on wire rack; cut into bars.

Wednesday, July 29, 2009

Cookies n' Cream Cheesecake Cookies

Okay, so I am so proud of this cookie! Not only is it delicious, but I made it up myself. I have adapted other recipes to my taste before, but this is the first cookie I have invented. I'm sure there is another cookie like this out there somewhere, but I haven't seen it.
My inspiration for this cookie came from a couple of different places. First, my grandma makes this amazing Chocolate Chip Cheesecake (which I will post at a later date), and I was originally going to duplicate that into a cookie, but then I was blog hopping and saw these mini oreo cheesecakes. If you don't know, my favorite thing to make, and eat, are cookies. So, the Cookies N' Cream Cheesecake Cookie was born! To make it a little more "cheesecakey" I drizzled it with some cream cheese icing. They were a hit!
Cookies N' Cream Cheesecake Cookies

1 c. butter, softened
8 oz. pkg. cream cheese, softened
1 1/2 c. sugar
1 egg
1 tsp. vanilla
1/2 tsp. salt
1 tsp. baking soda
1/4 tsp. baking powder
2 1/4 c. flour
2 c. crushed oreo cookies

Preheat oven to 350 degrees. Line cookie sheets with parchment paper. In a large bowl beat cream cheese and butter together. Add sugar and beat at medium speed until light and fluffy. Beat in egg and vanilla. Add dry ingredients and mix until just incorporated. With a wooden spoon or rubber spatula fold in crushed oreos. Drop by tablespoonfuls onto lined cookie sheets. Bake for 13-15 minutes, until the edges barely turn brown. Let cool on pan for 2 minutes and tranfer to wire rack or waxed paper to cool completely. Drizzle with CREAM CHEESE ICING (below) and enjoy! Store in airtight container in refrigerator.

CREAM CHEESE ICING (amounts are approximate)
1/2 pkg. cream cheese, softened
2 T. butter, softened
1 c. powdered sugar
1/2 tsp. vanilla

Combine all ingredients and blend well. Add water to drizzling consistency.
Posted by Picasa

Wednesday, July 8, 2009

Magic in the Middle Cookies

Okay, so this morning I was doing a little blog hopping and came across these cookies on My Kitchen Cafe . I decided I HAD to make them right away. I was craving some type of cookie and these SCREAMED at me. Peanut Butter and Chocolate are pretty much the best combination EVER, and these cookies are divine!!!
These look like nice unassuming chocolate cookies, but then you bit into it and there is a little "magic" inside!

They have a yummy gooey peanut butter center. It's pretty much like a thick peanut butter frosting inside! Doesn't that look good?!
I gave some to my parents and grandparents and my "little" (6'5") brother said they were the best cookies he had ever eaten! My mom has already asked for the recipe too, so here it is!

Magic in the Middle Cookies

Chocolate Dough:
1 1/2 c. all-purpose flour
1/2 c. unsweetened cocoa powder
1/2 tsp. baking soda
1/4 tsp. salt
1/2 c. sugar + extra for rolling
1/2 c. packed brown sugar
1/2 c. (1 stick) butter, softened
1/4 c. creamy peanut butter
1 tsp. vanilla
1 lg. egg + 1 egg yolk

Peanut Butter Filling:
3/4 c. creamy peanut butter
3/4 c. powdered sugar

Directions:
1. Preheat oven to 375 degrees. Line 2 cookie sheets with parchment paper (My cookies always come out better on parchment paper).
2. To make dough: In a medium bowl, whisk together the flour, cocoa powder, baking soda and salt.
3. In another medium bowl, beat together the sugar, brown sugar, butter and peanut butter until light and fluffy. Add vanilla and eggs, beating to combine. Then add dry ingredients and mix well.
4. To make filling: mix peanut butter and powdered sugar until smooth and dough like.
5. With floured hands or teaspoon scoop, roll filling into 1 inch balls (approx. 26).
6. To form cookies: Take 1 Tablespoon chocolate dough and roll into a ball. Then make and indentation with your finger and put a peanut butter ball in the middle. Bring up edges of dough to cover filling and roll again with your hands to create a ball. Repeat with the rest of your cookies.
7. Roll the chocolate balls in sugar and place on lined cookie sheet about 2 inches apart.
8. With a drinking glass, press down on each cookie until approximately 1/2 inch thick.
9. Bake in preheated oven for 7-9 minutes or until set.
10. Cool on wire rack.
11. Enjoy!


Posted by Picasa

Flirty Skirt Bag

I was over at my grandma's house, she's a sewing enthusiast, looking through some of her stuff and found a pattern, well, instructions for this adorable bag. I wanted a new cute bag to take all my Young Women's stuff to church in, so I decided to make it. It is called the "FLIRTY SKIRT" bag. There is also a pattern for a smaller purse, whereas this is the larger tote, but that one turns out pretty small I'm told. This is about the size my regular purse is. I need a little bigger one for all the junk I tote around. My next project is to make one for my mom. I'm using brown and teal for hers.

I think it is adorable with that ruffle around the bottom. The instructions were a little confusing, but I figured it out, and I experimented on a few things, but they turned out pretty good!


(That's my daughter's pajama pants you see in the background on the picture below! She wanted to be in the picture and was saying "Cheese"!) Anyway, I added the little outline of the lining fabric on the top of the bag. I thought it added a cute touch.
The inside has nice big pockets...perfect for those pens I'm always losing and extra little booklets and handouts and stuff!

This was a fun project! It didn't take too long and it turned out really cute, and now that I know what I'm doing it will be even easier next time!
Posted by Picasa
Related Posts with Thumbnails